

Concrete House Mould We Recommend for Durable Home Construction
2026-10-25
You can't build a home that lasts with a mould that gives up after a few pours. That's why the concrete house mould you choose matters just as much as the mix itself. At LugongMachinery, we put our name behind a short list of formwork options that keep walls straight, corners sharp, and your schedule on track. Here's what we recommend—and why it works for durable residential construction.
Why Concrete Moulds Outlast Traditional Timber Forms
The longevity of concrete moulds comes down to their material composition. Unlike timber, which absorbs moisture and swells or warps over time, concrete moulds are typically made from steel, aluminium, or reinforced plastic. These materials hold their shape under repeated stress, showing almost no deformation even after hundreds of uses. Timber forms, on the other hand, gradually lose their dimensional accuracy as the fibres break down, leading to uneven surfaces and costly rework.
Exposure to job site conditions also plays a major role. Rain, humidity, and temperature swings can rot or crack traditional timber forms within a few projects. Concrete moulds are largely immune to these environmental factors. They do not rust, delaminate, or attract pests the way wood does, allowing them to be stored outdoors and put back into service without special care. This resilience translates directly into fewer replacements and less downtime.
Over the life of a construction business, the difference in durability becomes a clear financial advantage. While timber forms may seem cheaper upfront, their short lifespan and frequent need for repair or replacement drive up total costs. Concrete moulds, by contrast, deliver consistent performance over many years, often outlasting dozens of timber sets. Contractors who make the switch find they spend less time on formwork maintenance and more time on actual pouring and finishing.
The Hidden Costs of Cheap Formwork You Should Know
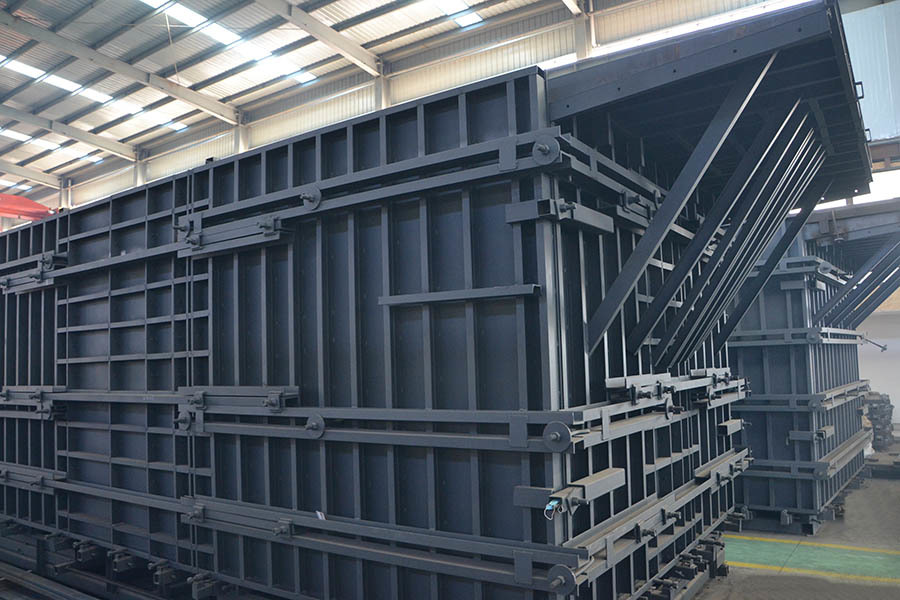
When the quote on formwork comes in unusually low, the savings usually show up later as surface defects. Thin plywood faces and undersized walers flex under the weight of wet concrete, letting slurry escape and leaving honeycombed finishes. The patch crews, extra grinding, and callbacks for visual concrete often erase the upfront discount several times over.
Reuse expectations quietly shrink with cheaper systems. Edges delaminate after two or three pours, corner brackets bend, and tie holes become oval, forcing crews to shim and brace more each time. That extra handling doesn't just add labor hours—it also disrupts the pour schedule, especially on multi-floor projects where formwork has to cycle quickly.
Safety risks tend to be the most expensive hidden line item. Underbuilt panels may hold for small test pours but can fail without warning under deeper sections or vibration. A sudden blowout stops work, damages embedded items, and can injure workers, triggering investigations and liability costs that dwarf the money saved on the original formwork purchase.
How Modular Mould Design Speeds Up Your Build Without Cutting Corners
When you strip away the marketing talk, most injection moulding delays come from one thing: every new tool starts as a blank sheet. Modular design flips that. Instead of machining a bespoke base, cavity, and core from scratch each time, you pick from a library of pre-validated plates, guide pins, ejector sets, and interchangeable inserts. The only parts you actually design from zero are the ones that touch your product geometry. That alone can cut lead times by 40–60% because you're not re-solving problems that were already solved on the last twenty jobs. And because those standard components have been through thousands of cycles, their tolerances and wear behaviour are already known—no guesswork about whether a slide will bind after 50,000 shots.
There's another time-saver that doesn't get enough credit: parallel production. With a conventional mould, the machining sequence is largely linear—rough the plate, harden it, wire-cut the pockets, then fit everything together. Modular setups let you send different blocks to different machines or even different shops at the same time. The cavity insert can be milled while the standard frame is being ground, and the hot runner manifold can be assembled off to the side. When it's time to mate them, you're doing final assembly, not discovering that a dowel hole is 0.02 mm out of place. For contract manufacturers running tight deadlines, this overlap is often worth more than any individual process speed-up.
Speed without quality usually means a tool that drifts out of spec after the first few production runs. Modular moulds avoid that trap through repetition. The interfaces between modules—pockets, ledges, screw locations—are machined to a fixed standard, so every insert seats the same way every time. If a gate insert wears, you swap it in the press without re-cutting the entire cavity block. That serviceability means you're not tempted to push a worn tool past its safe limit. And because the frame itself is reusable across projects, the cost of using a better steel or a more precise surface finish for the cavity gets spread out, so you actually upgrade the quality instead of cutting corners to stay on budget.
Insulation Tricks That Turn a Simple Mould into an Energy-Saving Shell
Most energy losses in a mould come from heat bleeding into the machine platens or the surrounding air. A rigid insulation board fitted between the mould and the platen can cut that transfer dramatically, keeping the process heat where it actually matters. It is a low-cost change that often pays for itself within a few production runs.
Another overlooked trick is to treat the mould surface with a thin ceramic thermal barrier. This slows heat absorption into the steel without changing the cavity dimensions, so cycle times stay stable while the heater works less. Pair it with edge insulators around the parting line and you stop the constant battle against thermal drift.
For moulds that run hot on one side and cooled on the other, segmented insulation helps create a more uniform shell temperature. You can place graphite or mica sheets only where heat loss is highest, instead of wrapping the whole block. The result is less energy draw, steadier part quality, and fewer warped components after ejection.
What to Look for in a Mould That Handles Extreme Weather
Look closely at the material spec before anything else. A mould rated for extreme weather won't rely on a single resin or metal type; it'll blend additives that resist UV breakdown, embrittlement in cold snaps, and warping under direct sun. Ask for test data covering thermal cycling, not just a one-time temperature rating, because repeated expansion and contraction is what eventually opens hairline cracks and lets moisture in.
Pay attention to how the mould manages water and airflow. Drainage channels, weep holes, and sealed joints should be designed so that rainwater or melting snow can't pool and then freeze, which puts enormous internal pressure on the walls. Also check that any gaskets or seals remain flexible at both -30°C and 50°C, not just at room temperature. A stiff seal in winter creates gaps that let wind-driven rain inside.
Finally, look at the surface treatment. Cheaper moulds often skip this step, but a thick anodized layer, powder coating, or a UV-stable capstock is what prevents surface chalking, fading, and corrosion after a few seasons of hail, salt spray, or intense sunlight. Run your hand over the finish; it should feel consistent, with no thin edges around vent openings or fastening points where the underlying material is exposed.
Real Builders’ Tips for Getting a Flawless Concrete Finish
The sheen on the surface tells you more than any clock. Once that watery gloss starts to fade and the concrete feels firm under a gloved thumb, you have a narrow window to work the slab with a magnesium float. Wait too long and you'll be fighting the set, leaving chatter marks that no amount of troweling will erase.
Most guys obsess over the middle of the pour, but the edges are where a finish goes bad. Run an edger along the forms after every pass with the bull float, not just at the end. This keeps the perimeter from drying out faster than the center, which is the usual cause of ragged, crumbling corners. A little extra water brushed on the edges before you float also helps.
Don't let a perfect finish die from neglect. Cover the slab with plastic sheeting or a curing compound as soon as it can support the weight without marking. If you use plastic, lay it flat and weigh down the seams so wind doesn't get underneath. The best finish in the world will dust and crack if the surface loses moisture too quickly during the first week.
FAQ
Steel moulds tend to hold their shape better over repeated pours and produce smoother, denser surfaces that resist weathering. For most residential projects we suggest modular steel panels with a protective coating.
Use a quality release agent and apply it evenly before each pour. Avoid over-applying, which can leave stains, and clean any residue off the forms right after stripping.
Yes, many modular mould systems allow you to adjust tie spacing or swap side rails to change thickness. That flexibility saves money when a house mixes load-bearing and partition walls.
After each use, remove hardened concrete while it's still green, rinse with low-pressure water, and store panels flat in a dry area. Check corner clamps and bolts monthly for wear.
For curves and decorative details, fiberglass or flexible plastic moulds are easier to shape and lighter to move. They may not last as long as steel under heavy production, but they handle one-off custom shapes well.
A good steel mould with proper care often stays accurate for 500 to 1,000 pours, depending on wall height and concrete mix abrasiveness. After that, face sheets may need resurfacing or replacement.
Inspect the face sheets for warping or deep scratches, confirm all clamp points align, and ask for a history of repairs. Slight surface rust is fine, but pitting on the forming face will show on your walls.
Absolutely. Smooth, well-fitted joints and minimal tie-hole patterns give a clean finish that needs less patching. If you plan to leave walls exposed, choose a mould with a high-quality face sheet and tight seam tolerances.
Conclusion
For a house shell that actually holds up, we steer people toward moulds built around steel-reinforced edges and modular locking plates rather than the flimsy timber frames that warp after a few pours. The upfront price difference is real, but cheap formwork tends to bleed money through blowouts, uneven corners, and constant rework—costs that never show up on the quote. A well-engineered modular mould, by contrast, clicks together fast and strips clean, so the crew isn't fighting the form all day. That speed doesn't mean cutting corners; it means fewer joints to leak, fewer alignment headaches, and more uniform wall thickness from pour to pour.
For colder or storm-prone sites, look for a mould system that accepts foam inserts or thermal break channels right inside the wall cavity—it turns the form into part of the insulation, not just a temporary shell. Builders we've talked to also stress checking tie spacing and corner gussets before buying: in high wind and driving rain, weak ties lead to bulged walls and water traps. For the finish, the old tricks still work best—vibrate in short lifts, use a release agent sparingly, and clean the faces before each pour. That combination of modular strength, built-in insulation, and careful handling produces a concrete home that looks sharp on day one and stays solid decades later.
Contact Us
Contact Person: Zhang Zhenlai
Email: [email protected]
Tel/WhatsApp: 8618563210000
Website: https://en.lugongmachinery.com/